Wednesday, May 14, 2014

JB Tech Info - Lost your Apple TV Remote?

Lost your Apple TV Remote?
They're quite small and easy to loose and cost $20 to replace.  Did you know you can program any remote to your Apple TV?  If you have an extra tv/vcr remote sitting around you can program it to your Apple TV.  You may need to borrow a Apple TV remote from someone else until you get the other remote programed.  The following are directions from Apple's website on how program an extra remote to your Apple TV.

http://support.apple.com/kb/HT3296

Apple TV: Using a third-party remote control

You can control your Apple TV with third-party infrared remotes. To use a third-party remote that came with your TV, cable box, or DVD player to control Apple TV, follow the steps below.

  1. Using the Apple Remote, choose Settings > General > Remotes.
  2. Choose Learn Remote.
  3. Select a setting on your third-party remote that doesn't control any devices in the area (such as a VCR, DVD player, or an auxiliary (AUX) device (used for an unspecified device)) or use buttons that don't control your TV or other devices.
  4. Select Start.
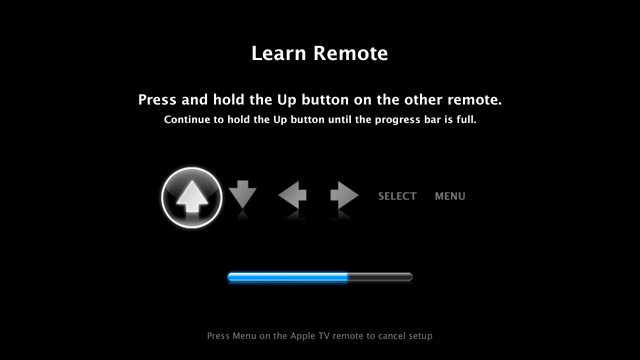
  5. Apple TV will show icons that represent the six buttons on the Apple Remote. The Up or + button should be highlighted.
  6. Using your third-party remote, press and hold the button you want to be Up until the blue progress bar is full. Apple TV will select the next button function.


  7. Repeat step 6 to program all six button functions.
  8. You can now use your third-party remote to control Apple TV.
You can also set buttons for fast-forward, rewind, next chapter, and more. You can rename, delete, or change your button choices by choosing Settings > General > Remotes and selecting the third-party remote. You can program additional remotes to control Apple TV by repeating steps 1 through 8. 

Additional Information

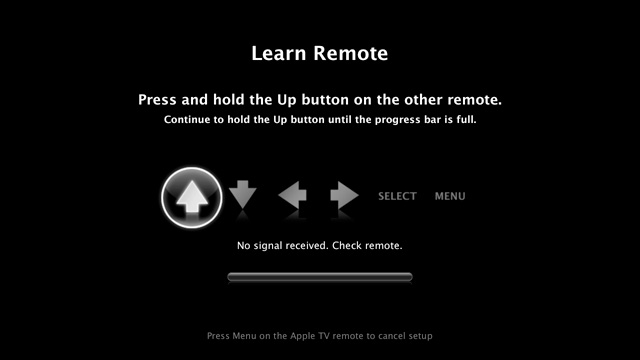
The "No signal received. Check remote." message may appear for these reasons:
  • Apple TV couldn't detect an infrared signal from your third-party remote within 20 seconds.
  • You may need to enable the button you are trying to program. Consult the documentation for your remote to learn how to enable buttons. 
The "Button already learned" message may appear for these reasons:
  • A different, previously-learned remote has a button with the same IR code as the button that you are trying to program.
  • A previously-learned button on the current remote has the same IR code as the button that you are trying to program.
You can use a different button or delete the previously-learned remote if you're not using it.
Important: Information about products not manufactured by Apple is provided for information purposes only and does not constitute Apple’s recommendation or endorsement. Please contact the vendor for additional information.

Friday, May 9, 2014

JB Tech Info - Self Service to add printers and software to your Mac

Self Service:

If you see this icon on your Mac, do not panic.  This little guy is going to help you install software, printers, and other things on your Mac in the future.  You can find this icon in your Applications list, which can be accessed by pressing F4 or clicking the launchpad icon on your dock:


I've already started adding software and printers to this Self Service portal.  If it says that your computer is currently patching, that means that software is being updated in the background.  Once it's done downloading in the background it will let you use it.  This just prevents you from unintentionally trying to download too much at once.  Check the box of the software/printer you want and click OK.  It will download and install it for you.

Stay tuned for more updates.

JB Tech Info - Password Expiration on Mac / Login Keychain

Password Expiration on Mac:
If you have changed your password and had this message pop up or something about the "Keychain Login", then this blog post is for you.

If you just changed your password you will see the above message. 
  1. Click Update Keychain Password
  2. Type your old password and it will update the Keychain to your new password.
If you didn't see the above prompt and are getting a "Keychain Login" error message the following will fix it:

http://support.apple.com/kb/ht1631

If you want your default keychain to be unlocked automatically when you log in, synchronize your Keychain Access and account login passwords by doing this:
  1. Open Keychain Access (you can get to it by choosing Utilities from the Go menu in the Finder).
  2. From the Edit menu, choose Change Password for Keychain "login."
  3. Type the former password of the account that you are currently logged in to, then click OK.
  4. If you entered the correct password, a new window appears; enter the original password again in the Current Password field.
  5. In the New Password field, type the password that matches your current account password.
  6. Re-enter the newer password in the Verify field, then click OK.

If you don't remember your original (former) account password

If you don't remember your original password, you'll need to delete the keychain. Deleting a keychain also deletes all the password data saved in that keychain.
  1. In Keychain Access, choose Preferences from the Keychain Access menu.
  2. If available, click the Reset My Default Keychain button. This will remove the login keychain and create a new one with the password provided.
  3. If Reset My Default Keychain is not available, choose Keychain List from the Edit menu.
  4. Delete the "login" keychain.
The next time you log in to the account, you can save your current password in a keychain.
If you are still having issues, please create a ticket in GLPS Support in RebelNet.


Monday, May 5, 2014

Rebel U 2014 {Our Attendees}

As our Tech & Media Team is busy preparing for Rebel U 2014, I thought I would take a moment to reflect on the attendees that have registered for our day.  Rebel U is designed by the Godfrey-Lee Technology & Media Team for the staff of Godfrey-Lee Public Schools.  Each year, we have several presenters from outside the district that present and attend sessions throughout the day.  At the conclusion of each Rebel U day, we have all participants complete an evaluation that allows us to gain insight about session offerings, structure of the day, and other information.  Our team truly values the input we receive from teachers and we use the information we gather to structure and plan future technology professional development offerings and Rebel U days.  Our amazing teachers are what makes our Rebel U day amazing for everyone involved!

Below are some charts that share some information about our registered attendees for Rebel U 2014.  This year for registration, we opted to use Google Forms.  In the past, we have used Eventbrite because of the ability to limit the number of registrants per session.  Eventbrite worked great for that reason, but gathering other information and reporting that data out was a little cumbersome.  So this year we chose to use Google Forms with the FormRanger script.  By using this script, we were able to build a simple registration form that was easy for end-users to navigate for registration, limit the number of attendees per session, as well as gather other information that would allow us to aggregate data about our attendees in a variety ways (as exemplified in the charts below!).  This has worked great for us and the data we have been able to pull has been awesome!

The following chart shows the registration across the buildings across our district.
The following chart shows a breakdown of the grade levels taught/roles of our attendees.

The following chart shows a breakdown of the subject areas taught/roles of our attendees.

The following chart shows how many of our attendees are on Twitter.

The following chart shows how many of our attendees have their own teacher website.

One of our main goals with Rebel U is building professional learning opportunities that allow our teachers to self-direct their own learning.  Our team feels that "technology integration professional development" is such a broad term that can be interpreted in so many different ways depending on the structure and environment of ones' job.  By building a learning model that allows teachers (and other attendees) to select their learning topics of interest, we hope that everyone is able to take something away that they can implement into their job, instruction, or student learning process.

The following charts show the breakdown of registration for the breakout sessions throughout the day.   For more information about our sessions and presenters, please check out our agenda here.


Lastly, we have a chart showing the awesome superheroes that are favorites of our attendees.

Friday, May 2, 2014

Rebel U 2014 Celebrates 5 Years! {Presenter Information}

Our Tech & Media Team has been busy preparing for Rebel U 2014 and we are excited about the many things that are in store for the day already.


One thing we have been working on developing over the past couple of years is data collection.  We are working on building a sustainable program that accurately represents our technology professional development as well as celebrates the amazing things our teachers are doing in their classrooms and with their students.  When we open our call for presenters, we ask all presenters (and their co-presenters) to complete a form that lets us know a little bit about them, as well as provides information about their session (to view more information about our presenters, please click here).  The information we gather from presenters not only allows us to share with our teachers about the session offerings for the day, but it also allows our Tech & Media Team to see some of the great implementations that have transpired from teacher initiative and exploration, professional development, student learning needs, and collaboration among staff and students.  We are proud of how our program has developed over the past four years and can't wait to see what year five brings for our staff!

If you are interested in learning a little bit more about how our program has progressed over the past five years, please take a look at some of the charts below.  If you are unable to view the charts or would like to view more detailed information and additional charts, please click here.

LinkWithin

Related Posts Plugin for WordPress, Blogger...